Saturday, June 25, 2016

Best out of waste: key / toothbrush / napkin holder using empty shampoo plastic bottle

How to make a key, toothbrush and napkin holder with an empty shampoo bottle? DIY best out of waste

Best out of waste how to make key, toothbrush and napkin holder with an empty bottle
Mom, where are my motorcycle keys? I am sorry; I will be late, not finding my keys at the right place. Dad, my teacher asked me to make a small project on best out of waste .would you please suggest me what can I present in school? Can we think of using the plastic in a better way rather than simply throwing in dust bin which additionally create the environmental pollution?
The best answer to all these questions is how to use our creativity to make the best use of the plastic waste. You will agree with me , when we go to the supermarket, we generally get puzzled in making our decision which one to buy .Look and feel is one of the deciding parameters helps us in picking the right one. Today my thought process is how we can reuse the empty shampoo bottle which has the pump connected to it. Now it’s a time to recover the cost of the look and feel which we paid to buy it.

Holder is very common and needs at every home either to hold the bunch of keys or hang the napkin towels. Any idea, what am I talking about? Yes, very true, I am talking here to make the holder using the empty shampoo plastic bottle. This holder will serve the purpose as key holder or toothbrush holder or combined to these a napkin holder. This Holder is easy to make and absolutely with no cost, but it will be the unique and special. 

Let’s take a look at what we’ll need.

  • Empty shampoo bottle which has pump
  • A sharp cutter 
  • And marker pen 

Once you gather all your materials together, follow the simple steps below.

1.Preparation of the key holder 
Best out of waste how to make key, toothbrush and napkin holder with an empty bottle
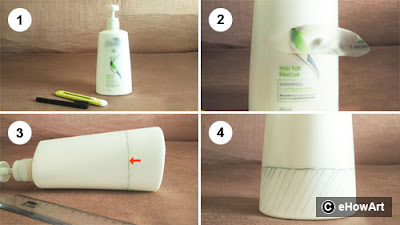
Clean the bottle properly from inside and outside. Wash the outside surface to look shiny .Now mark a line at a distance of 3 inches from the bottom. This line shall be around all sides of the bottle. This will be our cutting line. For better visibility, make shading in this area .No much preparation is needed other than this. It’s very easy, isn’t it?   

2.Let's finish the key holder
Best out of waste how to make key, toothbrush and napkin holder with an empty bottle
Generally, shampoo bottles have flat surfaces on both sides but if the bottle has a flat surface on one side only then please make sure the hanging hole must be on the flat surface. On flat surface mark half circle having a radius of 1 inch. The shaded portion as shown in image to cut
You will see the bottle shape now as shown in the image, however, based on the space and where you are hanging this holder, may vary the size and may give decorative shape. Now take out the tube and fix the cap back to the bottle. Make a hole for hanging this holder on the wall.

3.The key holder, ready to use.
Best out of waste how to make key, toothbrush and napkin holder with an empty bottle
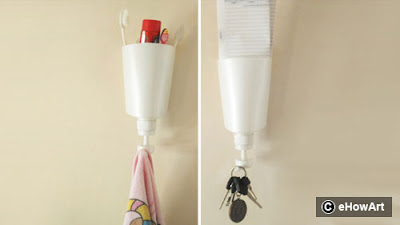
Here is now the holder ready to use to keep the toothbrushes or hanging the towel or use this for hanging the keys & envelope .This also may be used in Kitchen to keep the spoons and Kitchen towel. 

I have written this post to share my creativity with you all. I hope, you will like this and want to try it .This is just an example of how to re-use the empty shampoo bottle. You will find a lot of opportunities is waiting for you. Let’s go for it and enjoy.  

Please check out our previous posts on this blog: http://ehowart.blogspot.in/
DIY best gift on father’s day (handmade photo frame)
Sari painting in Indian style
Lord Vitthal painting on canvas
Pouch using pot holder
Tea coaster using unusable CD
Fancy tie knot (Trinity)
Origami paper shoes
How to make artificial flowers with stocking cloth?
Fancy bow hair pin
Fancy tie knot (Fishbone)
Cross bag using pot holder
Best of waste: DIY bracelet using dead USB cable
Saturday, June 18, 2016

stitching : cross bag using pot holder

stitching project step by step cross bag using pot holders

Today we will make Bag using Pot holder

Bag, potholder, pompom, woollen, zip, cross bag step by step, craft, girl, creative, ehowart, Sanjays blog, surekhas blog, creative thinking, unique, simple, easy craft, kids, Sanjay & surekha’s blog
The Bags using pot holder are easy to make and look beautiful, but the best part is that they can be made real quickly and it will make you special.

Let’s take a look at what you’ll need.

Bag, potholder, pompom, woollen, zip, cross bag step by step, craft, girl, creative, ehowart, Sanjays blog, surekhas blog, creative thinking, unique, simple, easy craft, kids, Sanjay & surekha’s blog
You’ll need:

Two pot holders, a pair of scissors, wool bundle & a zip.

Once you gather all your materials together, follow the simple steps below.

1. Take Zip and put upside down.

2. Fix the zip on one of the sides of potholder. 

3. Take another potholder, keep zip at center and other side of zip to be fix on the second pot holder.

4. After joining the both potholders with Zip, you will noticed it as shown in image.

Now cut the wool pieces 12 no’s with equal length of approx. 1 meter .Make a knot at one end.

5. Now take 12 open ends, split into 3 groups and weave them


6. So you will noticed now after completion of weaving, woolen belt will look like this

7. Leaving zip side as it is, fold the extra zip inside, add woolen belt and stich remaining 3 sides.

8. Similarly fix the other end of wool belt on second Corner.


9. Now let’s make the bag. decorative. Take 1 meter long wool, fold it again and again to make approximate 3 inch length to make the pompom. Insert the bunch into the hole of the pot holder which is originally meant to hang the potholder.


10. Tie the pompon with wool


11. Cut the extra or uneven length and trim the pompom

12. Similarly fix the pompom at other end

13. Now bag is ready and make your impression everywhere


Please check out our previous posts under this blog http://ehowart.blogspot.in/

Our Previous Posts are:


craft: stick tape hair bow pin

easy quick craft duct or washi tape hair bow pins


Today we will make Hair Bow Pins


hair bow, clip and accessory, bows, clip mechanism, step by step, craft, girl, creative, ehowart, Sanjays blog, surekhas blog, tape, cello tape, duct tape, creative thinking, unique, simple, easy craft, kids
These Bow Pins are easy to make and look beautiful, but the best part is that they can be made real quickly


Let’s take a look at what you’ll need.


You’ll need:


hair bow, clip and accessory, bows, clip mechanism, step by step, craft, girl, creative, ehowart, Sanjays blog, surekhas blog, tape, cello tape, duct tape, creative thinking, unique, simple, easy craft, kids
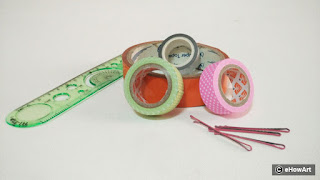
Colorful and Designer stick (Cello) tapes, a pair of scissors, Hair Pins, Measuring scale


Once you gather all your materials together, follow the simple steps below.


1. Take 2 pieces of Designer stick tapes each one of length 5 inch and 2.5 inch.


2. First take 5 inch length tape and make a fold at 1.5 inch length from one end.


3. Similarly make a fold at 1.5 inch length from other end.


4. Press by fingers at center of the tape to get the bow shape, please ensure the folded side shall be inside.

5. Now take another piece of 2.5 inch length. Paste it in center of the bow,

6. Wrap it in center of bow.

7. Your bow is almost done.

8. Take hair pin.

9. Put the hair pin inside the bow.

10. Now your Hair Bow Pin is ready to use.  

11. To make it unique and special, you may choose different combination of color tapes.

12. Here is all done. Enjoy!!!


Please check out our previous posts under this blog http://ehowart.blogspot.in/


Our Previous Posts are: