Sunday, July 24, 2016

Best out of waste: DIY Tea coaster with unusable Compact Disc (CD)

How to make tea toaster using CD? Best out of waste

best out of waste, diy, do it yourself, creative, reuse craft, school project, kids craft, handmade gift, easy craft, how to make tea coaster, coaster, silky thread, simple, unique craft, diy tea coaster, diy coaster, how to make coaster, compact disc, cd
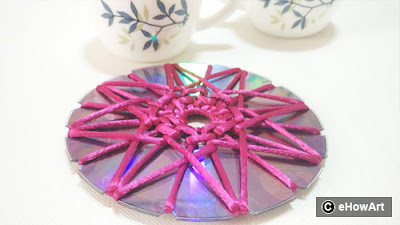
I found a creative way of making tea coaster using the unusable compact disc and thought of sharing this with you all. I am sure you will love this simple but creative idea and will make it yourself .It doesn’t need any expertise and even kids can make this just will small help from elders. I don’t say, we can’t get the Tea coaster in the market, its ease to get but if we use some creativity to it, will be unique and special.

Let’s see, what all we need? 
  • Unusable Compact Disc (CD)
  • A pair of scissors
  • Thick silky thread 
Simple 3 steps
1. Let’s make the CD suitable for our artwork.
best out of waste, diy, do it yourself, creative, reuse craft, school project, kids craft, handmade gift, easy craft, how to make tea coaster, coaster, silky thread, simple, unique craft, diy tea coaster, diy coaster, how to make coaster, compact disc, cd
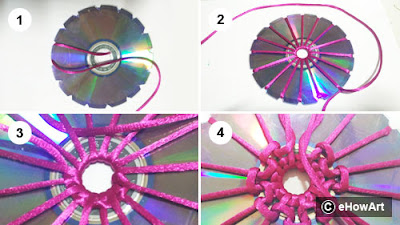
Take any unusable CD and we need to mark 16 equal parts .Mark 1st location at any point and hold it , opposite to that will be the second point .third and the fourth point will be on another axis .Now we are done with 4 points at 4 quadrants . Similarly, mark 3 points in each quadrant now so that all 16 locations for cutting will be ready. We are going to make the gear teeth slots on out CD periphery .These slots are necessary to have to hold the thread at the periphery. Make the 16 slots using a pair of scissors .Hold the thick silky thread with one hand leaving approximately 4-inch length ,start weaving it , complete one round passing through all slots and tie a knot Here we got 16 spokes . As shown in image 3, take any spoke, just like a basket weaving one from over and other from below alternately, we need to complete one round again passing through all the slots and spokes. Now as shown in image 4, take 2 spokes together , make a round at second spoke and go one similar like the previous one like basket weaving over and below alternatively.      

2. Let’s add the design to our tea toaster.

best out of waste, diy, do it yourself, creative, reuse craft, school project, kids craft, handmade gift, easy craft, how to make tea coaster, coaster, silky thread, simple, unique craft, diy tea coaster, diy coaster, how to make coaster, compact disc, cd
Here, we will be adding the triangular shapes design. We need to form 5 groups of slots if I call them as  A,B,C,D &E. Start with A, make a fold at C at the back side ,as shown in image 5 and bring it back to E and just round it once and go one further .Similarly, we need to make 4 triangular designs. We have taken group of 5 slots here and completed 4 triangles, it means we need to restart from 5 Th  group again, just calling E as A to complete another 4 triangles, as explained in next step    

3. Let make our Tea coaster ready to use.
best out of waste, diy, do it yourself, creative, reuse craft, school project, kids craft, handmade gift, easy craft, how to make tea coaster, coaster, silky thread, simple, unique craft, diy tea coaster, diy coaster, how to make coaster, compact disc, cd
Here we will be completing 4 triangles and adding 4 more in the center of those ones. After completing remaining 4 triangles, out tea coaster will be ready to use. We need to make sure that the Tea coaster should be perfectly flat and no topple down Do not make the knot on the plain surface of the CD but to make it at the hole of the CD to serve our purpose.     

This post is dedicated to all my fans who always want to make the best use out of waste and keep their creativity as a royal treatment to their guests. Someone may use this idea to make bigger size coaster to keep the soup bowl or even this can extend to any size depends on upon what we have and how to make use of it .In my post, I have used available thick pink thread .I don’t say everyone to start searching the same thread, use whatever is available to serve our purpose.

Did you like this? I have posted several posts on this blog, you may follow below links to see other creativity which is easy to make.

Please check out our previous posts on this blog: http://ehowart.blogspot.in/

DIY best gift on father’s day (handmade photo frame)
Sari painting in Indian style
Best out of waste: key/toothbrush/napkin holder
Lord Vitthal painting on canvas
DIY pouch using pot holder
Fancy tie knot (Trinity)
Origami paper shoes
How to make artificial flowers with stocking cloth?
Fancy bow hair pin
Fancy tie knot (Fishbone)
Cross bag using pot holder
Best of waste: DIY bracelet using dead USB cable
Monday, July 18, 2016

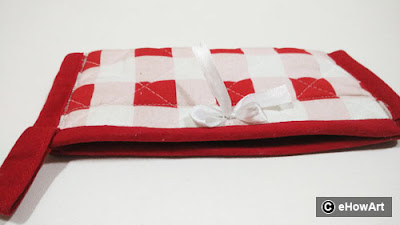
DIY pouch using potholder


How to make a pouch using pot holder in three steps?

diy, do it yourself, creative, reuse craft, school project, handmade gift, easy craft, how to make pouch, pot holder, Velcro, satin ribbon, simple, unique craft, diy pouch, stitching, simple stitching project, ehowart
Creativity has no limit as long as we think it differently. If things are easily available in the market then why should we invent the wheel? Doing ourselves always makes you feel happy. Today, let’s see how differently we can make use of the pot holder. We don’t need expertise person in stitching but he/she should have basic knowledge on how to stitch in a straight line .I have chosen “pot holder” as the main material to make the universal/multipurpose pouch for three reasons.

  1. The borders of the pot holders are already stitched.
  2. It has a hand holding belt already stitched.
  3. It’s easily available in the market with low cost.

diy, do it yourself, creative, reuse craft, school project, handmade gift, easy craft, how to make pouch, pot holder, Velcro, satin ribbon, simple, unique craft, diy pouch, stitching, simple stitching project, ehowart
Let’s gather all items to make pouch as shown in image (1)
  • Pot holder with attractive color combination
  • Velcro
  • Satin ribbon

We will follow three steps as mentioned below
  1. Cut the Velcro as per the size of the pot holder. We need to make sure the Velcro must not overlap on borders. Stitch the Velcro with pot holder only on 2 opposite sides as shown in image (2)
  2. Fold the pot holder at the centre by keeping Velcro inside. After folding, Velcro will stick automatically and stitching will be ease. Stitch 2 folded sides of the pouch carefully.
  3. Make a bow knot with the satin ribbon and stitch it on the pouch to make it decorative .You may use the most decorative material as per availability and your choice.
This pouch is very useful while travelling .we can use this as multipurpose like pencil box, shaving kit, jewelry handy bag, medicine pouch and so on.Kids find it difficult to open or close when there is a zipped pouch but they will be happy to see with Velcro.Did you like this? 

Sunday, July 17, 2016

Best of waste: DIY bracelet using dead USB cable

How to make a bracelet using best use of dead USB cable to make the bracelet ?

best out of waste, diy, do it yourself, creative, reuse craft, school project, kids craft, handmade gift, easy craft, how to make bracelet, USB cable, metal wire, satin ribbon flower, simple, unique craft, diy bracelet, diy bangle, how to make bangle, power cable craft
In today’s digital world, USB cable plays a vital role in daily needs especially to charge the mobiles. Generally, we find too many USB cables lying here and there at home, office bag .I do have this situation at my home. One day I was trying to connect my mobile with USB cable which I to computer and I attempted 2 cables but didn’t able to charge it. I wasted at least 2 hours in investing what went wrong, whether my computer USB port has an issue or something went wrong with those cables .Finally, I come to the conclusion my USB cable was the culprit. So I decided to throw those defective cables .I realized, I was throwing money in the form of those cables which I bought a month back ,then thought, can I use these  cable somewhere else ? Can I do something usable out of it?

I started playing with cable, it was a very funny moment my daughter was watching me at the same time she must be thought of its so important work for my mom so she also joined me. She asked, “Mom, what are you trying to do? Can I help you? “I simply ignored her and then suddenly I saw she took another cable and made a knot to it and put in her hand. I looked at her and said yes my dear angel; I want to make the unique bracelet for you using the defective cables. I asked my daughter, will she liked it? She said, Mom, of course, yes but on one condition that bracelet must be very attractive that none of my friends have such and neither it’s available in any shop.

Let’s check simple steps as mentioned below to follow while making a special bracelet for my angel.
Prior to really go into the steps, we need to follow, let’s see what we need to have at one place.
  • Defective or not usable USB Cable
  • Thin flexible metal wire
  • Needle and thread
  • A pair of scissor
That’s all we need.

best out of waste, diy, do it yourself, creative, reuse craft, school project, kids craft, handmade gift, easy craft, how to make bracelet, USB cable, metal wire, satin ribbon flower, simple, unique craft, diy bracelet, diy bangle, how to make bangle, power cable craft

1. Fix the beads to the cable ends.

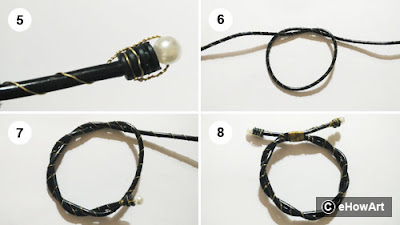
We don’t need the metallic pin of the USB cable, cut it off and now we have a one piece cable without metal plugs. We need to fix the bids at both ends of the cable. It’s very simple .Take 1meter length thin metal wire, fold it to 3inch and twist it at cables end. Twist the wire carefully so that the twist will look like a rope. Insert a bead into the twisted wire and hold it on top of the cable. Fix it with the small end of wire.

best out of waste, diy, do it yourself, creative, reuse craft, school project, kids craft, handmade gift, easy craft, how to make bracelet, USB cable, metal wire, satin ribbon flower, simple, unique craft, diy bracelet, diy bangle, how to make bangle, power cable craft

2. Let's finish the bracelet

We have with us the left out the metal wire which we need to wound around the cable. Make a knot at center and give the round shape .please make sure the size of the round is to suit the wrist and it should easily pass through your hand. Repeat the knot until the end of the cable, upon completion; you will see the rope-like pattern. Follow the same process for another end of cable too and let’s complete the entire circle. Both ends and bracelet circle hold together and tie with metal wire, wound the wire for around 1-inch distance to make it good looking.

best out of waste, diy, do it yourself, creative, reuse craft, school project, kids craft, handmade gift, easy craft, how to make bracelet, USB cable, metal wire, satin ribbon flower, simple, unique craft, diy bracelet, diy bangle, how to make bangle, power cable craft

3. Decorate the bracelet

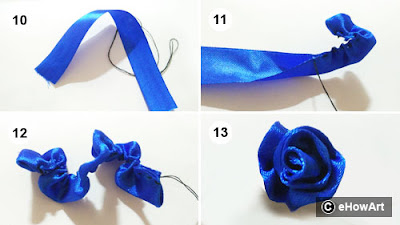
Take satin ribbon of length approximately 6 inches. Fold the ribbon at center along the width and stitch both ends throughout the length .Pull the thread and stretches the ribbon so that the length of ribbon will be reduced to 3inch. We will be making a flower with this just by making a roll of it and stitch at one of the ends we need to make sure the folded (unstitched) side should be up.


best out of waste, diy, do it yourself, creative, reuse craft, school project, kids craft, handmade gift, easy craft, how to make bracelet, USB cable, metal wire, satin ribbon flower, simple, unique craft, diy bracelet, diy bangle, how to make bangle, power cable craft
Make 2 flowers with satin ribbon; fix them to the bracelet by stitching.
Your bracelet is ready .Did you like this?

I am happy that I made something out of the waste. My angel was very proud to see her creation as the idea owned by her. This is just an idea, the same can be implemented using any such waste material lying at our home to make bracelet, It doesn’t matter what decorative thing you will like to add to it, make it awesome with your choice and gift it to your most lovable person, I am sure that will be the best gift for her.


Please check out our previous posts on this blog: http://ehowart.blogspot.in/


Wednesday, July 13, 2016

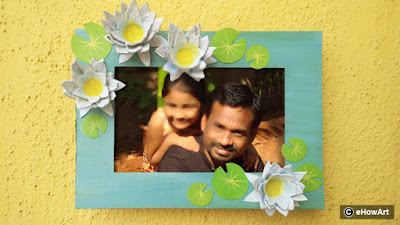
DIY best gift on father’s day ( handmade photo frame )


How to make the water-lily photo frame with egg boxes? DIY Best out of waste


cardboard frame, best out of waste, father's day gift, diy photo frame, egg box craft, egg carton craft, egg cover craft, water lily craft, pond craft, diy, do it yourself, creative, reuse craft, school project, kids craft, handmade gift, easy craft, flowers photo frame, how to make photo frame, ehowart
I am dedicating this post to all little champs who want to give their best surprises and most valuable gifts to their parents ,friends and get some more ideas on how can we make the best use of our creativity like school projects by making an attractive photo frame. In today’s digital world, we have many ways to wish someone special as my idol of my life but don’t you agree with me handmade crafts are the best and add love and respect into it and make it a special handmade gift.

As I mentioned, we don’t need to go to the market to buy any new things to create the water lilies photo frame with egg boxes. What we need is to look at the cupboard, kitchen, and collect them together. Eggs are the best source of food energy in the form of proteins. We don’t do anything with Egg’s packaging boxes other than throwing in dust beans. This is the first identified item we will need to start with this creativity. Will it be good for you to list down what we will need? Okay, let’s list them out.


cardboard frame, best out of waste, father's day gift, photo frame, egg box craft, egg carton craft, egg cover craft, water lily craft, pond craft, diy, do it yourself, creative, reuse craft, school project, kids craft, handmade gift, easy craft, flowers photo frame, how to make photo frame
  • Egg’s packaging boxes (cardboard boxes)
  • Cardboard
  • Pen or pencil or any marker
  • Cello tape
  • Measuring scale
  • Paint and paint brush
  • Thick transparent plastic sheet  
  • And a pair of scissors and paper cutter

We need to follow simple steps.

1.Cut carton cups from egg boxes.

cardboard frame, best out of waste, father's day gift, photo frame, egg box craft, egg carton craft, egg cover craft, water lily craft, pond craft, diy, do it yourself, creative, reuse craft, school project, kids craft, handmade gift, easy craft, flowers photo frame, how to make photo frame
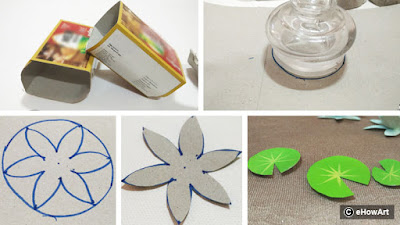
First, let’s separate the egg cups from the boxes so that we can process them one at a time to required shapes to save our cutting time and will help us in improving the finishing. Very easy, isn’t it?

2.Let's make petals now.

cardboard frame, best out of waste, father's day gift, photo frame, egg box craft, egg carton craft, egg cover craft, water lily craft, pond craft, diy, do it yourself, creative, reuse craft, school project, kids craft, handmade gift, easy craft, flowers photo frame, how to make photo frame
Draw petals with pencil or marker on the carton cups. Do this for all cups. Use your skill here to make the petals outline uniform so that it will give a unique visual look when we will use them on our photo frame. We will take one carton cup, mark the outline on it and will trim as per outline. This we will be using as a ready piece as the stencil. Use this piece as a stencil to mark on other pieces. Cut all petals and make them ready.

3.Now it’s a turn to make leaves and lower petals.

cardboard frame, best out of waste, father's day gift, photo frame, egg box craft, egg carton craft, egg cover craft, water lily craft, pond craft, diy, do it yourself, creative, reuse craft, school project, kids craft, handmade gift, easy craft, flowers photo frame, how to make photo frame
Take the egg box cover. Now we are going to make leaves and lower petals of water lilies. Make a circle on the cover of diameter 2.5 inches. Draw petals in the circle similar to the earlier made. For leaves make circles and cut small conical shapes from it similar to water-lily leaves. How to do this? Please look at the photograph. Color the leaves with light green colors. Add details with dark green colors on leaves.

4.How to make water-lily flowers with egg boxes? 

cardboard frame, best out of waste, father's day gift, photo frame, egg box craft, egg carton craft, egg cover craft, water lily craft, pond craft, diy, do it yourself, creative, reuse craft, school project, kids craft, handmade gift, easy craft, flowers photo frame, how to make photo frame
Take the lower petal which we cut from box cover .Put some glue in the center of it. Paste the petal which we cut with egg cups. Now paste another similar petal of a flower inside the first petal. Please make sure the petals should not overlap each other. The petal from the second group should come in between earlier two petals. Color all flowers with white and put some yellow colors in the center of the flowers to look like real water-lily. Here we are ready with the flowers.

5.Let’s make the frame with carton piece.

cardboard frame, best out of waste, father's day gift, photo frame, egg box craft, egg carton craft, egg cover craft, water lily craft, pond craft, diy, do it yourself, creative, reuse craft, school project, kids craft, handmade gift, easy craft, flowers photo frame, how to make photo frame
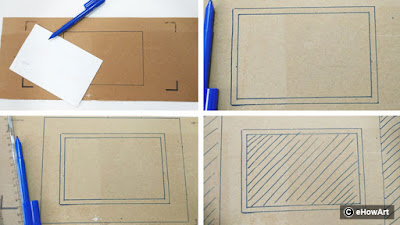
Take a carton piece from any used carton box. For the size marking, take a photograph print which you want to frame. Make an outline of the photograph on carton piece. Make another rectangle inside the first rectangle. Please keep the size of this rectangle smaller than the first rectangle by half-inch from all sides. Now we need to make the third rectangle outside the first rectangle. Please keep this rectangle bigger than the first rectangle by two and half-inch from all sides. Cut out the inner and outer part as shows that photograph with cross lines. Here the frame cutout is ready.

6.Let’s do the last finishing touch.

cardboard frame, best out of waste, father's day gift, photo frame, egg box craft, egg carton craft, egg cover craft, water lily craft, pond craft, diy, do it yourself, creative, reuse craft, school project, kids craft, handmade gift, easy craft, flowers photo frame, how to make photo frame
Take a ready final cut out, stick transparent plastic sheet on one side of the frame. Now we are going to make a space for the photo. From here, you can keep changing the photographs when you want. We need to cut “C” shape piece of width half-inch and inside dimension will be equal photo size. This is nothing but packing, which we will add with the frame to get the space to keep the photo. Now cut another rectangular piece of the carton of the same size of C-shape piece. Paste C-shape piece on the frame over the top of the transparent plastic sheet. Then paste last rectangle (which is similar in size with C-type shape) over the top of C-type shape piece. Fix the supporting piece of suitable size to the frame on the back side to keep the frame on the table or anywhere. Please make sure the height of the supporting piece needs less by half-inch than the width of the frame.

7.The frame is ready.

cardboard frame, best out of waste, father's day gift, photo frame, egg box craft, egg carton craft, egg cover craft, water lily craft, pond craft, diy, do it yourself, creative, reuse craft, school project, kids craft, handmade gift, easy craft, flowers photo frame, how to make photo frame
Now it’s time to color. Choose the color shades similar to water so that it will look like water pond. Fix leaves and flowers on the frame. Add some more artistic look to it and your Father’s day gift is ready.

This is exactly the best example of learning from kids all the times. On father’s day, my daughter made this with small help from her Mom and gifted me as best father’s day gift. That night, I was so impressed and thought of writing this post. That’s how I have dedicated this post to all little champs.
I am sure implementation of this and similar ideas are very well possible for school projects, birthday gifts, and so many areas.

Please check out our previous posts on this blog : http://ehowart.blogspot.in/


Saturday, July 9, 2016

The journey (vari) started towards lord vitthal

How to do lord vitthal painting in the short timeline? 

vitthal, vithoba, pandharpur, Ekadashi, dindi, vari, wari, palakhi, bhima, chandrbhaga, varkari, lord vithhal, pandurang, canvas painting, art, ehowart, surekha Bharne, Sanjay Bharne, Sanjay and surekha, dive ghat, aalandi, dehu, grandma gift, mother gift, mom gift

One day my daughter went to her grandmother’s house to meet her. My mother, her grandma was waiting for her from a long time back. They both are chatter boxes and together they have their own world. As usual, she was demanding brand new story from grandma. Grandma was thinking and thinking to create the new story but there was nothing new left in her wallet of stories. She suddenly said,“Hay Lord Vitthalplease help me to find something new”. My daughter’s eyes twinkled and she also followed grandma “Oh! Lord Vitthal”. She looked at her and declared with the clap, “Grandma, last time you promised to take me to meet Lord Vitthal next time. So when we are going?” My mother was silent. I knew that mom is not going to Pandharpur this year in “Vari” (Dindito meet Lord Vitthal because of her knee pain. Now it is impossible for her to walk 250 Kilometers in about 15 days. Yes! It is 250 kilometers in about 15 days.

I told my daughter that Grandma has a lot of pain to her knees, and Lord Vitthal's home is long away. So she can't walk or travel this year. My little Angel replied innocently “then let's ask Lord Vitthal to come our home to meet Grandma." All started laughing, even my mother. My Angel didn’t understand why all of them were laughing. She came to me and said I want to invite Lord Vitthal to our home. Even I also started thinking. Then I realized that I have to take initiative on this to make my daughter’s wish fulfill. Being as an artist, I thought let me try to do painting on this subject and dedicate this one to my little Angel’s innocence. You might be thinking, how that will be wonderful? Don’t you?

Lord Vitthal is whole Maharashtra's deity. Every year approximately hundreds of thousands of devotees (Varkari) go in possession to Pandharpur for annual pilgrimage (Vari).Every year this number of devotees increasing. You will find a lot of youth taking part in Vari which is a good thing to continue the culture. This is a history from last 800 to 900 years. Lord Vitthal’s temple in Pandharpur is very old, was constructed before the 13th century. The architecture of the temple is Hemadpanthi. The temple is placed on banks of Bhima (Chandrabhaga) river. So, how Pandharpur & Pune is connected to me, my angel and my Mom? My mom is born and brought up in a small village near Pandharpur and now we all are living in Pune, Maharashtra (INDIA)


Prior to starting the painting, I have studied;
  • Painting theme
  • Layout
  • Painting size
  • Medium
  • Timeline
  • Colour scheme
I had two choices with me for the theme of the painting.
  1. Vitthal is standing inside the temple with silver decorative shapes as a background.
  2. Vitthal is standing in front of all walking devotees in Dive Ghat holding orange flags in the rainy atmosphere.
I thought that my Mom should feel that she is walking along with all devotees to meet Lord Vitthal. So, I finalized my painting theme will be composed of Lord Vitthal and devotees walking towards Pandharpur. I decided to create a painting on three canvas panels. The devotees will start their journey from Right side 3 Feet panel towards Left side same size panel& the center panel will join them as standing Lord Vitthal with his both hands on his waist.

I chose the canvas for a painting of size 5 feet height, so that when my Mom will see the painting she should feel that she is actually in front of Lord Vitthal. For long life of my painting which will be seen by Mom, I chose acrylic colors as a medium on canvas. Acrylic colors are quick drying and were suitable for my timeline. The timeline was very important for me to complete the painting. The last day for pilgrimage was after 20 days which was Maha Ekadashi. I wanted to surprise my Mom on the same day with nicely framed painting put on the wall at Mom’s home. While doing all this in the planning phase, I talked to the framing vendor and chose the best frame suits to my theme and he promised me to deliver the framed painting in a day time. It was a great relaxation for me. The pilgrimage is normally in June-July month. Those are rainy days. So, I decided to use colors of rainy clouds, wet roads, and wet brown hills.


vitthal, vithoba, pandharpur, Ekadashi, dindi, vari, wari, palakhi, bhima, chandrbhaga, varkari, lord vithhal, pandurang, canvas painting, art, ehowart, surekha Bharne, Sanjay Bharne, Sanjay and surekha, dive ghat, aalandi, dehu, grandma gift, mother gift, mom gift
The painting with three canvas panels was completed well within the timeline. I got excellent support from my framing vendor to make this happen in shortest framing time.  This was the most valuable gift for my Mom. She was so satisfied. Finally, my angel asked her grandma, “Have we kept our promise? The way we decided whether the Lord Vitthal came to our home.”

Everybody at home again started laughing. At this time also my little angle did not understand why all we are laughing but she also started laughing with us. The chatterboxes open and continued.
vitthal, vithoba, pandharpur, Ekadashi, dindi, vari, wari, palakhi, bhima, chandrbhaga, varkari, lord vithhal, pandurang, canvas painting, art, ehowart, surekha Bharne, Sanjay Bharne, Sanjay and surekha, dive ghat, aalandi, dehu, grandma gift, mother gift, mom gift
Here is the final painting in three panels together. 

Please check out our previous posts on this blog: http://ehowart.blogspot.in/
Cross bag using pot holder


Saturday, July 2, 2016

Sari painting : opportunity can be en cashed with your creativity


sari painting, saree painting, mural sari painting, south indian sari painting, kerala sari painting, cotton silk sari painting , ehowart, blog by sanjay bharne, blog by surekha bharne, blog by sanjay & surekha, Krishna on sari, peacock feather sari border, acrylic color sari painting

How to do sari ( Saree ) painting or saree mural painting?


One of my friends from South India invited me to her house for a dinner party. She had a huge collection of saris; still, she was saying she has no special sari to wear to the cousin's wedding ;) I agree with her as this wedding was important for her.
She took me to the shopping mall to help her in choosing the best and unique Sari. After few hours of search, we couldn’t find the new sari to buy, so we came back home. I looked back her collections once again and noticed there is a plain white sari available but that was kept just at the bottom of a bunch of saris in the wardrobe. When I took that white sari, I was in love with it and being an artist, I thought, this is the best sari in her collection and here the deal happens! “Within 15 days, either I will make over the simple to a masterpiece, else will give her the brand new sari as a gift from me”. I accept the deal. You must be thinking, what’s a great deal for any artist? It’s a journey of creativity to enhance the customer satisfaction.
I took that Sari to my home and started thinking what can be the best creativity for my friend to get convinces her. It was 6 yards long and plain off-white with decent golden border. In Kerala, all the traditions are important followed as part of their life. Before I really jumped into makeover of Sari, I did research on

  • Cost effectiveness
  • Durability
  • Easy to use for painting
  • Easily available in market
  • Quick dry while painting
  • Washable

Let’s see the step by step followed for a makeover to masterpiece sari.
1.  The texture on the Sari which I chose for painting was difficult to paint as it was the transparent cloth where paint easily gets penetrates on the other side of the sari. So newspaper was used as the best solution to avoid the paint to not to spill over on another side.
2.  Main criteria to select the medium was
·       Cost effectiveness.
·       Durability
·       Easy to use for painting
·       Easily available in market
·       Quick dry while painting
·       Washable
While keeping in mind, these essential criteria, I chose “water-based acrylic colors”.
3.  I had a great understanding of my friend’s choice, what it suits her and then I gave a traditional theme to her as Lord Vishnu’s avatar Lord Krishna. Generally, Pallu is the most attractive part of sari. So to do this, I have decided to create the painting of Lord Krishna on Pallu.
4.  The peacock feather is one of the favorites of Lord Krishna. This led me to choose peacock blue, green & dark blue as relevant color scheme.
5.  The motif is a single design element to create a replica of it at several places. Motif shall be simple but good looking with fewer efforts. We need to be sure all motifs on the border should be exactly same, just like twins. I chose peacock feathers motif for the border of the sari.
sari painting, saree painting, mural sari painting, south indian sari painting, kerala sari painting, cotton silk sari painting , ehowart, blog by sanjay bharne, blog by surekha bharne, blog by sanjay & surekha, Krishna on sari, peacock feather sari border, acrylic color sari painting
I used a stencil to make an outline of the motif. This helped me to maintain the similarity and of course it’s a time-saving idea. We can unfold the part of sari which we need to paint. The acrylic colors have quick dry characteristic. In the case of constraint in space on the floor for sari painting, we can fold the painted part after 15-20 minutes.
sari painting, saree painting, mural sari painting, south indian sari painting, kerala sari painting, cotton silk sari painting , ehowart, blog by sanjay bharne, blog by surekha bharne, blog by sanjay & surekha, Krishna on sari, peacock feather sari border, acrylic color sari painting
As I mentioned earlier, Pallu should be most attractive part of sari, I chose a detailed painting of Lord Krishna on Pallu of the sari. Even though the area of Pallu is much smaller than border of sari, but require almost same time because of much detailing work.     
Here is the masterpiece.
sari painting, saree painting, mural sari painting, south indian sari painting, kerala sari painting, cotton silk sari painting , ehowart, blog by sanjay bharne, blog by surekha bharne, blog by sanjay & surekha, Krishna on sari, peacock feather sari border, acrylic color sari painting

It was one of my best creativity dedicated to my friend. Her pleasure after seeing this masterpiece can’t be expressed in few words. 
We may think of starting the sari painting business.