How to make the water-lily photo frame with egg boxes? DIY Best out of waste
I am dedicating this post to all little champs who want to give their best surprises and most valuable gifts to their parents ,friends and get some more ideas on how can we make the best use of our creativity like school projects by making an attractive photo frame. In today’s digital world, we have many ways to wish someone special as my idol of my life but don’t you agree with me handmade crafts are the best and add love and respect into it and make it a special handmade gift.
As I mentioned, we don’t need to go to the market to buy any new things to create the water lilies photo frame with egg boxes. What we need is to look at the cupboard, kitchen, and collect them together. Eggs are the best source of food energy in the form of proteins. We don’t do anything with Egg’s packaging boxes other than throwing in dust beans. This is the first identified item we will need to start with this creativity. Will it be good for you to list down what we will need? Okay, let’s list them out.
- Egg’s packaging boxes (cardboard boxes)
- Cardboard
- Pen or pencil or any marker
- Cello tape
- Measuring scale
- Paint and paint brush
- Thick transparent plastic sheet
- And a pair of scissors and paper cutter
We need to follow simple steps.
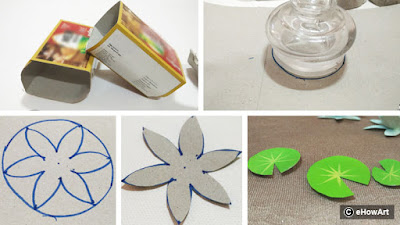
1.Cut carton cups from egg boxes.
First, let’s separate the egg cups from the boxes so that we can process them one at a time to required shapes to save our cutting time and will help us in improving the finishing. Very easy, isn’t it?
2.Let's make petals now.
Draw petals with pencil or marker on the carton cups. Do this for all cups. Use your skill here to make the petals outline uniform so that it will give a unique visual look when we will use them on our photo frame. We will take one carton cup, mark the outline on it and will trim as per outline. This we will be using as a ready piece as the stencil. Use this piece as a stencil to mark on other pieces. Cut all petals and make them ready.
3.Now it’s a turn to make leaves and lower petals.
Take the egg box cover. Now we are going to make leaves and lower petals of water lilies. Make a circle on the cover of diameter 2.5 inches. Draw petals in the circle similar to the earlier made. For leaves make circles and cut small conical shapes from it similar to water-lily leaves. How to do this? Please look at the photograph. Color the leaves with light green colors. Add details with dark green colors on leaves.
4.How to make water-lily flowers with egg boxes?
Take the lower petal which we cut from box cover .Put some glue in the center of it. Paste the petal which we cut with egg cups. Now paste another similar petal of a flower inside the first petal. Please make sure the petals should not overlap each other. The petal from the second group should come in between earlier two petals. Color all flowers with white and put some yellow colors in the center of the flowers to look like real water-lily. Here we are ready with the flowers.
5.Let’s make the frame with carton piece.
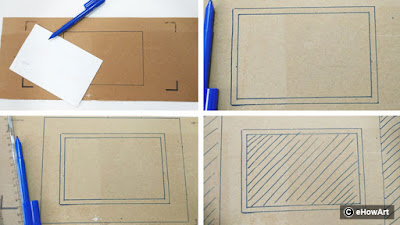
Take a carton piece from any used carton box. For the size marking, take a photograph print which you want to frame. Make an outline of the photograph on carton piece. Make another rectangle inside the first rectangle. Please keep the size of this rectangle smaller than the first rectangle by half-inch from all sides. Now we need to make the third rectangle outside the first rectangle. Please keep this rectangle bigger than the first rectangle by two and half-inch from all sides. Cut out the inner and outer part as shows that photograph with cross lines. Here the frame cutout is ready.
6.Let’s do the last finishing touch.
Take a ready final cut out, stick transparent plastic sheet on one side of the frame. Now we are going to make a space for the photo. From here, you can keep changing the photographs when you want. We need to cut “C” shape piece of width half-inch and inside dimension will be equal photo size. This is nothing but packing, which we will add with the frame to get the space to keep the photo. Now cut another rectangular piece of the carton of the same size of C-shape piece. Paste C-shape piece on the frame over the top of the transparent plastic sheet. Then paste last rectangle (which is similar in size with C-type shape) over the top of C-type shape piece. Fix the supporting piece of suitable size to the frame on the back side to keep the frame on the table or anywhere. Please make sure the height of the supporting piece needs less by half-inch than the width of the frame.
7.The frame is ready.
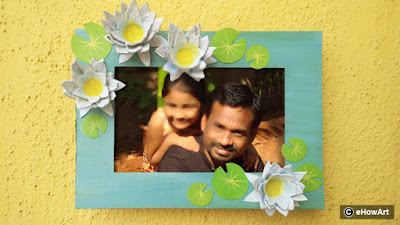
Now it’s time to color. Choose the color shades similar to water so that it will look like water pond. Fix leaves and flowers on the frame. Add some more artistic look to it and your Father’s day gift is ready.
This is exactly the best example of learning from kids all the times. On father’s day, my daughter made this with small help from her Mom and gifted me as best father’s day gift. That night, I was so impressed and thought of writing this post. That’s how I have dedicated this post to all little champs.
I am sure implementation of this and similar ideas are very well possible for school projects, birthday gifts, and so many areas.
Please check out our previous posts on this blog : http://ehowart.blogspot.in/


No comments:
Post a Comment