Sunday, August 28, 2016

How to make a lamp using plastic bottle for decorating your house?

How to make a lamp using a plastic bottle for decorating your house?

My today’s post is being dedicated to arts and crafts with my creativity in sharing with you how we can make a unique lamp for your home. Believe me, it will not cost much for you as we will be using waste things normally those are not useful and we throw them in the dustbin. Our mood normally depends on upon the color of lights. In today’s busy world, when we are back to home, we always preferred to have soft light and the silent music is on and just relaxes for a couple of minutes doing nothing. This gives us our energy back for tomorrow.     

best out of waste, how to make DIY lamp with pebbles and plastic-bottle, decorative lamp, best use of plastic bottle, lamp making competition, homemade lamp, unique, simple, interior lightning, creative
Well before we really start making the lamp; let’s see what all we need to gather? 
  • Empty water bottle
  • Glass pebbles with single or multi colors (Flat at one surface)
  • Ceramic paste (will be available in market in 2 different packets that need to mix it together) 
  • A bulb with electric wire.  
Some basic tools also we need to keep aside like a cutter, marker
Let’s begin to start making our unique lamp. 
best out of waste, how to make DIY lamp with pebbles and plastic-bottle, decorative lamp, best use of plastic bottle, lamp making competition, homemade lamp, unique, simple, interior lightning, creative
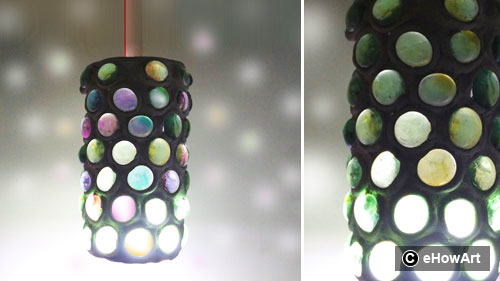
Take an empty plastic bottle, cut out the dome shape so that you will have left with the cylindrical piece and this is what we will require. Take a mixed ceramic paste; please make sure this paste doesn’t stay good after 15 minutes and becomes dry and probably you will not able to make use of it. So don’t mix it in advance. Apply the ceramic paste at the open end of the bottle, as being seen in image 2. Now it’s a turn to fix the glass pebbles .How to fix the glass pebbles with a plastic bottle? Do we need any other things to fix it? No, the ceramic paste is good for us. Take few glass pebbles and make the border with ceramic paste as shown in image 3. We need to make sure that the spillover of the paste shouldn’t happen at the inner surface of glass pebbles; else it will restrict the light illumination or transparency. Let’s complete first row and then move on and complete fixing of all glass pebbles on the bottle surface. 
best out of waste, how to make DIY lamp with pebbles and plastic-bottle, decorative lamp, best use of plastic bottle, lamp making competition, homemade lamp, unique, simple, interior lightning, creative
After fixing the pebbles, you will notice in between the surface of the bottle is open for light but we need to cover the entire surface. So, apply the ceramic paste wherever the transparency is there. Our aim is to have lights coming only through glass pebbles. Once we are done with this, we all are now set and just need to think how to attach the electric bulb into it. I found my way but you may have some better ways to fix bulb into it. What I did, I put the small hole at the bottom as shown in figure 6 and passes the wire from it.
Safety is of topmost important ,so I have used small PVC pipe to cover the electric wire and it helped me in keeping the lamp steady and straight once I put it with the ceiling.
Glass pebbles play a vital role in color shade of the light. The choice is with you which color you want and choose the glass pebbles colors accordingly.
Did you like this post? Is it easy to make? Please DIY. 
Friday, August 19, 2016

How to make handmade tea light lamp or latern or candle holder

Hello friends,
I just enjoy this creation. After completing it got a satisfaction for its beauty and use both. Its really good example for best use of waste. It requires an empty coldrink can and some creative weapons! Its true, with the use of creativity artist can use anything as a weapon. It needs cutter to cut, big needle or any pointed thing to make the holes and off course some patience. As an artist we are always in a hurry to finish an art piece.

So let's start!
Tea light candle holder, handmade lamp, handmade latern lamp with empty cold drink can, tin craft, best out of waste, reuse craft, creative, simple craft, DIY handmade lamp, tin lamp craft


Tea light candle holder, handmade lamp, handmade latern lamp with empty cold drink can, tin craft, best out of waste, reuse craft, creative, simple craft, DIY handmade lamp, tin lamp craft
  1. We need an empty cold drink can marker pen, needle or some pointed thing to make holes, and cutter.
  2. With the help of marker draw the design on the can. At the top an bottom you can make different design motifs. You can make flowers or simple straight lines patterns. 
  3. Start by making the holes on the can. The top and bottom part is very harder than middle part, so you can use small hammer or something else to make holes with needle. Be patient it will take some extra time.
  4. Now finish the design with holes in middle part. Its quiet easy to do that top and bottom part. Here we need to do vertical lines design.
Tea light candle holder, handmade lamp, handmade latern lamp with empty cold drink can, tin craft, best out of waste, reuse craft, creative, simple craft, DIY handmade lamp, tin lamp craft

5. After that we will start cutting the can. Cut out the black part as shown in image 5 pointed by an arrow. Repeat the cutting process for the complete can.

6. Press the can vertically from the top and bottom. Press it slowly and you can see the the petals are coming out. Our lamp is ready to use!

7. Now take a tea light candle and put it inside the lamp between the petals. 

8. After putting tea light candle we can light it with matchstick. Use 2 tea light candles, keep one inside the lamp and another at the top of the lamp.

It's done, this is the simple process of tea light candle holder or lamp or latern from an empty cold drink can, which we always crush and throw in dustbin. This is the another good example of best out of waste!


Please check out our previous posts on this blog: http://ehowart.blogspot.in/


Sunday, August 14, 2016

How to make simple and eye catching Rakhi at home?

How to make simple and eye catching Rakhi at home?


Raksha Bandhan (Rakhi) is the festival of brother and sister. This is one of the important festivals in India. Sister put the small band of love and care on her brother’s hand and  in return her brother committed to his sister to protect her from all problems and keep promising to remain with her in her good and bad situations throughout the life. This festival is being celebrated normally in the month of August. You will find a lot of stalls are selling very attractive Rakhis .The sisters who can’t go to his brother’s home, in such cases they send the Rakhi through post /courier service. Almost every school, you will find the Rakhi making competition and students do take active participation in it.
It’s very common to get Rakhi in a market, but what if a sister makes the unique Rakhi for her loving brother? Will it not be creative? In my today's post, I will be sharing quick learning steps on how to make the Rakhi at home. I am sure after reading this post, you will able to make it yourselves .Even this post will be useful to crack the Rakhi making competition in school for your kids.
rakhi, rakshabandhan how to make  rakhi at home, kundan rakhi, origami rakhi, quilling rakhi, best out of waste ganesha rakhi, school project rakhi, tutorial, step by step


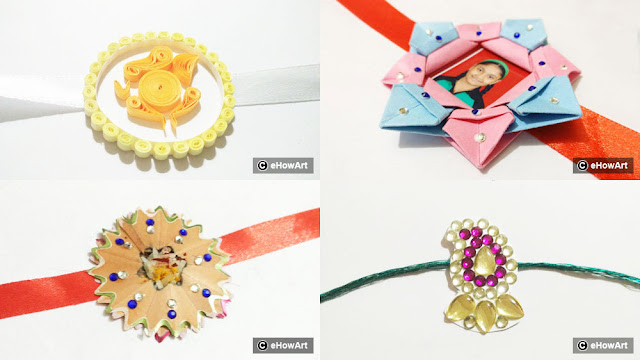
  1. How to make a quilling Rakhi?
  2. How to make a paper origami Rakhi?
  3. How to make a best out of waste Rakhi?
  4. How to make a Kundan Rakhi?
So, let's start first with quilling Rakhi.
rakhi, rakshabandhan how to make  rakhi at home, kundan rakhi, origami rakhi, quilling rakhi, best out of waste ganesha rakhi, school project rakhi, tutorial, step by step
  1. As we know Ganesha is the symbol of purity. for making a Ganesha quilling Rakhi, first cut the circle with 2 inches diameter on a white paper. Use a thick paper as a base for a rakhi. with an orange strip, make a circle and paste it in the center of the white circle paper.
  2. Then make the other parts of Ganesha as shown in image 3 and paste them
  3. with white strip, make a circle on base paper around the Ganesha. Don't forget to keep space for outer layers of small circles.
  4. with the yellow quilling strips make small circles and paste them. Add a satin ribbon to tie rakhi and decorate more as per your choice.
Now this is personalized photograph rakhi.

  1. This tutorial is quite lengthy but worth for making a unique Rakhi. For this Rakhi we need 2, 4 inches size colored square paper. Keep 1 piece as is and cut the other piece into same equal pieces. 
  2. Take a piece of paper and make 4 (vertical, horizontal and 2 diagonals steps)
  3. Make 2 horizontal folds at center as shown in image 3
  4. As shown in image 4 make 2 another folds at center.
  5. Open the fold and make the diagonal folds sharp.
  6. Make a roof shape fold by pressing the paper.
  7. Repeat the same roof shape fold down also.
  8. Please check carefully image 8, open the roof fold at one side and change it into a square fold.


rakhi, rakshabandhan how to make  rakhi at home, kundan rakhi, origami rakhi, quilling rakhi, best out of waste ganesha rakhi, school project rakhi, tutorial, step by step


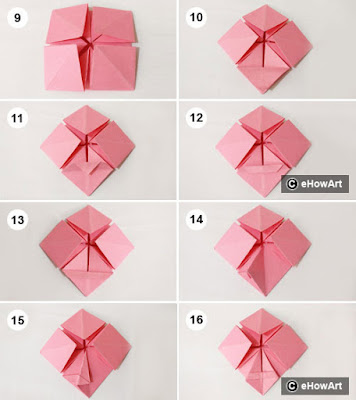
9. Repeat the square folds on other 3 sides also.
10. Fold the square diagonally in the center.
11. Open the fold and fold the corner of a square in half as shown image 11.
12. make fold as shown in image 12.
13. make the third fold as shown in image 13.
14. make a vertical center fold for a square.
15. Make a diagonal fold as shown in image 15.
16. After repeating the folds on both sides we will get a petal.


rakhi, rakshabandhan how to make  rakhi at home, kundan rakhi, origami rakhi, quilling rakhi, best out of waste ganesha rakhi, school project rakhi, tutorial, step by step

17. Make  another 3 petals in the same way.
18. Now take a small piece of paper and make 4 vertical, horizontal and 2 diagonal folds on it.
19. Make a square fold with it as shown in image 19.
20. Fold the corner of the square in half and unfold it.
21. Fold the corner in 1/4 as shown in image 21.
22. make second fold as shown in image 22.
23. Now make the third fold as per image 23.
24. Fold the square shape vertically.


rakhi, rakshabandhan how to make  rakhi at home, kundan rakhi, origami rakhi, quilling rakhi, best out of waste ganesha rakhi, school project rakhi, tutorial, step by step

25. Make a diagonal fold as shown in image 25.
26. Unfold the vertical fold.
27. Repeat the diagonal fold on the other side of the square. we will get a part of Rakhi.
28. Complete the other 3  parts also. Now we have 5 parts total.
29. Now it's time to assemble. Put 1 blue in between of pink parts.
30. Make a fold on the corner as shown in image 30.
31. Put folded corner inside the blue part.
32. Repeat the same steps for another 3 sides. Yu will get a flower shape. Stick an Icard size photo of brother or sister inside it. Add a satin ribbon to tie the Rakhi on hand. Decorate the rakhi to look more beautiful.


rakhi, rakshabandhan how to make  rakhi at home, kundan rakhi, origami rakhi, quilling rakhi, best out of waste ganesha rakhi, school project rakhi, tutorial, step by step

Now it's a turn for Rakhi which is a good example of best out of waste.

  1. We can make this Rakhi with waste materials. It's good for a Rakhi competition in school. Just peel the pencils with a sharpener. Peel out whole circles while sharpening. We need 2 circular peeled pencil parts.
  2. take a small piece of paper and paste the first circle on it, then paste another circle on it.
  3. Add some gum in the center of Rakhi and put some rice grain on it.
  4. Then add Haldi Kumkum on rice grain. stick the satin ribbon at the back of the Rakhi. Decorate it with Kundans or you can put some colors as per your choice.
Now its a last very simple rakhi with Kundan.
rakhi, rakshabandhan how to make  rakhi at home, kundan rakhi, origami rakhi, quilling rakhi, best out of waste ganesha rakhi, school project rakhi, tutorial, step by step

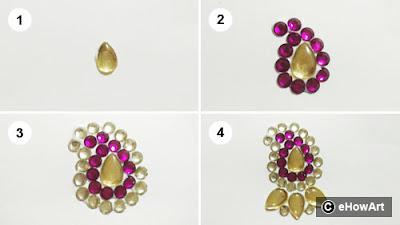
  1. Take a small piece of white paper and paste a drop shape Kundan on it.
  2. Make a mango shape outline with round shaped Kundan around the drop shaped Kundan.
  3. Make an another mango shaped  outline with small circular golden Kundan around earlier mango shape.
  4. Put 3 drops shaped Kundans and 2 small round shaped Kundan below the mango shape. Wait till all the Kundans fix on paper. cut out the extra paper with a scissor. Add thread in rakhi to tie your lovely brother's hand.
Wish you a very Happy Rakshabandhan!!!


Happy Independence Day with bands and Rangoli in tri colors

Happy Independence Day with bands and Rangoli in tricolors


INDIA. I can’t explain how I feel when I hear the word India. We used to start preparing ourselves for this day at least a month before. Everyone wanted to be perfect in parade and want to make sure no mistakes can happen, so we had practice every day. Lezim is another activity in school on the Independence Day. We can’t forget the drill (kavayat) where all the students in the uniform and tried to give best during the drill (Kavayat).
I feel very lucky that I got my birth after Independence. 15th August is the Independence Day. The time has now changed now and we all are getting busy in day to day life but when I looked back my school days, we used to celebrate this day in memorable ways like drawing competition , speech competition, painting competition. Today I thought I should write this post dedicated to the Independence Day with using the tricolors. My post has four sections.
Happy indepenace day celebration, bracelet, band, wool craft, rangoli, tri color, tiranga, design, easy, creative,diy, how to make wool band, how to make rangoli

1. Tri color band –close weaving 
2. Tri color band – open weaving 
3. Tri color Rangoli using dots
4. Tri color Rangoli free hand


Let’s learn how to make Tri color band with close weaving 

Happy indepenace day celebration, bracelet, band, wool craft, rangoli, tri color, tiranga, design, easy, creative,diy, how to make wool band, how to make rangoli
It’s very easy to make in simple four steps 
We need to take eight woolen threads in equal length and make 4 groups. Each group will consist of 2 and follow the colors as white, green, white and orange. Make a knot combining all of them .Fix it in writing pad’s clip so that it will be easy to handle while making a band.
Orange color is the first color in Tiranga (Indian Flag), it’s a symbol of bravery. Take a group having orange color and make knot around the white wool as shown in image 2.
White color is the second color in Tiranga and it’s a symbol of piece .Take white color wool and make a knot as shown in image 3.
Last is Green .It’s a symbol of revolution. By taking this color wool , we will be now completing the tri color band as shown in figure 4.


Making a tri color band in open loop is not at all difficult

Happy indepenace day celebration, bracelet, band, wool craft, rangoli, tri color, tiranga, design, easy, creative,diy, how to make wool band, how to make rangoli
For this band we need 3 woolen threads, one each of Orange, White & Green. Arrange them as shown in image 1, which will look like the heart shape. As shown in image 2, pass right sided end below the other end of wool. Pass the right sided end as indicated in image 3 following the arrows. Pull the both end of wool gently until you get the shape as shown in image 4.this is very important step which will give the right visual look to this band.


Happy indepenace day celebration, bracelet, band, wool craft, rangoli, tri color, tiranga, design, easy, creative,diy, how to make wool band, how to make rangoli
The process which we followed so far through image 1 to 4, which will further continued. As shown in image 5, create a loop with right sided end. Now moving 

ahead, the left sided end needs to pass below the other end as shown in image 6. Left sided end needs to pass just following the arrows as shown in image 7. Pull both ends gently and adjust the length as you need to fix it over the hand, as shown in image 8. 
Cut the extra length of wool once you knot them together. 

Tri color Rangoli using dots

Happy indepenace day celebration, bracelet, band, wool craft, rangoli, tri color, tiranga, design, easy, creative,diy, how to make wool band, how to make rangoli
Rangoli is the nice way to decorate the entrance of house and shows warm welcome to our guests. This is very simple and easy Tri-color Rangoli design especially for Independence Day. 
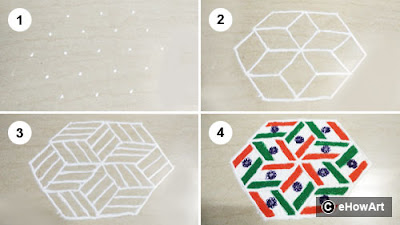
For first row, put only 5 dots with equal interval in a straight line. This will be our middle row of our Rangoli. Now above and below, take in between center of the dots and put 4 dots .Now take in between centers again and put 3 dots at one row above and below. With this, we will get 5 rows, please make sure the dots are rightly placed before we proceed further .The outline of dots should be a hexagon shape.
As shown in image 2, join the dots with lines, you will get 12 diamond shapes. Now please look at the image 3, we need to divide each diamond shape in 3 equal parts as like our Tiranga. The angle and direction of division lines must follow the pattern as shown in image. Fill the Rangoli using tri color (Orange, white and green) as shown in image 4.Also make Ashok Chakra in the center of white bands. If you want, you may include few more details around the hexagon.

Tri color Free hand Rangoli

Happy indepenace day celebration, bracelet, band, wool craft, rangoli, tri color, tiranga, design, easy, creative,diy, how to make wool band, how to make rangoli
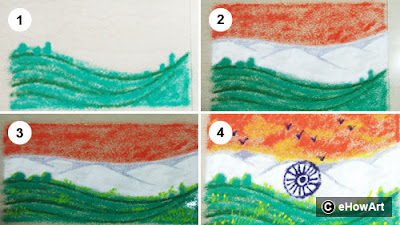
In this Rangoli you can see our Tiranga and scenery too. This Rangoli is a symbol of geographically rich India which has green forest at bottom, white snow at middle and 

Snow Mountains with orange color sky at the top.
Let’s start with Green forest of our India. Use two green colors to show trees and grass differently. White color to be use at middle as shown in image and draw the mountain lines with light blue colors ,finally add orange for the sky , adding few yellow shades will give reach look to this Rangoli. Draw Ashok Chakra at the center of white band. As a final touch add some birds in the sky and some shades of light green colors to indicate the grass.
Your Rangoli is now ready. 

I am dedicating this post to our country –India .This is our national festival and we celebrate it with proud and happiness. We are so lucky to be a part of our nation.
Bharat Mata Ki Jay!!!

Please check out our previous posts on this blog: http://ehowart.blogspot.in/

DIY best gift on father’s day (handmade photo frame)
Sari painting in Indian style
Best out of waste: key/toothbrush/napkin holder
Lord Vitthal painting on canvas
DIY pouch using pot holder
Fancy tie knot (Trinity)
Origami paper shoes
How to make artificial flowers with stocking cloth?
Fancy bow hair pin
Fancy tie knot (Fishbone)
Cross bag using pot holder
Best of waste: DIY bracelet using dead USB cable   

Saturday, August 6, 2016

how to make simple creative and unique friendship bands?

DIY simple unique friendship bands.


Hello! Friends!! How are you? First of all, Happy Friendship Day!!
Ehowart, simple, unique, creative, easy craft for kids, best out of waste, pearls, beads friendship band,  paper quelling  friendship band, woolen friendship band, empty packet  friendship band

A friend is an important part of our life. They are heartbeats of our life. We really can't enjoy the life without friends. Today is the special day, it is a friendship day. We have types of friends in our circle. I love to celebrate a friendship day. On every friendship day, we all friends meet and enjoy the whole day with food and chitchat. Also, we tie a band to show that we are the best friends forever. I always try that my friendship band should be different that others, so my friends can remember me. It is easy to buy a friendship band from the market. But best friends deserve a unique, creative and handmade band.
I feeling very happy to share friendship bands made by me.

This is the first friendship band with pearls.

Ehowart, simple, unique, creative, easy craft for kids, best out of waste, pearls, beads friendship band,  paper quelling  friendship band, woolen friendship band, empty packet  friendship band

  1. Cut the wool in 3 pieces. Fold the in the center. tie them together with a knot. You will get 6 pieces together. Now use a clip pad to hold the wool pieces. Make 3 parts of wool and wave them as shown in image 1 for about 3 inches.
  2. Take a needle with small thread and tie it in the center of wool. Add 9 pearls in the wool with the help of the needle. Add pearls in all 3 pieces of wool.
  3. Continue the same type of waving but now start adding a pearl for every step.
  4. Wave the pieces of pearls till you get 5 inches long design. After that again wave without pearls for three inches and make a knot at the end.
Our friendship band with pearls is ready!


Now we will make a friendship band with quilling paper strips. We need quilling paper strips, a pair of scissors, gum and a thread.
Ehowart, simple, unique, creative, easy craft for kids, best out of waste, pearls, beads friendship band,  paper quelling  friendship band, woolen friendship band, empty packet  friendship band

  1. We need 6 different colors paper strips. Arrange the paper strips as shown in the image 1.
  2. Now take another 3 strips and wave them like a mat with first 3 paper strips as shown in image 2. You can paste them together so that it will make next steps easy for us.
  3. In image 3 look at the pink strip. In same way fold the strip and wave with the brown strip like a mat.
  4. Similarly in image 4 look at the green strip. Fold it and wave like a mat.
  5. Continue waving and complete the 5 inches piece.
  6. Now stick the ends and cut the remaining strips.
  7. Make a fold at the both ends.
  8. In the waving pattern, make a space for the thread to insert. Add the thread to tie the friendship band.
The friendship band with quilling paper strips is ready to tie!

Now it is a turn for a simple wool friendship band.
Ehowart, simple, unique, creative, easy craft for kids, best out of waste, pearls, beads friendship band,  paper quelling  friendship band, woolen friendship band, empty packet  friendship band

  1. Take the 8 pieces of wool. Make a knot and divide them into 4 groups.
  2. Now take the first group of 2 pieces and make a knot as shown in image 2 
  3. Tie a knot in the same type with other 2 groups. Take care that the position of a knot in slanting position. Now after making the knot with the first group the second group will come in the first position. Repeat the same step with it. Wave the complete friendship band till 10 inches. Make a knot at the end holding all pieces of wool.
The woolen friendship band is done!

Now it is the best example of best out of waste.  Also need a pair of scissors.
Ehowart, simple, unique, creative, easy craft for kids, best out of waste, pearls, beads friendship band,  paper quelling  friendship band, woolen friendship band, empty packet  friendship band

Ehowart, simple, unique, creative, easy craft for kids, best out of waste, pearls, beads friendship band,  paper quelling  friendship band, woolen friendship band, empty packet  friendship band
  1. Take an empty packet of milk powder or salt or anything else which is silver colored coating inside. 
  2. Make folds of 2 cm on the whole packet.
  3. Cut the pieces about the size of 2cm X 8 cm. The ratio of the size should be 1:4.
  4. Take a piece from the cutouts of a packet.
  5. Make a horizontal fold in a center.
  6. Now make a vertical fold in a center. Fold all the pieces in the same way.
  7. Now take 2 pieces. Closed sides of the pieces should be on the same side.
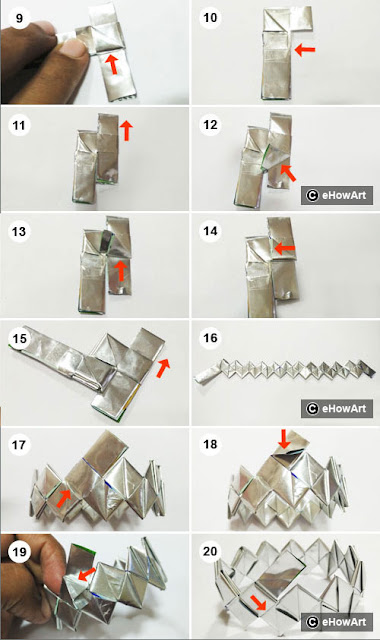
  8. As shown in image 8, insert the one piece inside the other piece. At upper red arrow take care to keep space similar to the thickness of piece, because we will add another piece there. Now at lower red arrow make a diagonal fold as shown in the image.
  9. Fold the diagonally folded piece again. 
  10. Repeat these 2 folds on another side also and stick them with a stick tape near the red arrow in image 10
  11. Now insert the third piece.
  12. Make a diagonal fold as we did for the first piece.
  13. Fold the diagonally folded part of the second piece again.
  14. As shown in image 14 near the red arrow, there is a gap. Insert the end of folded pieces there.
  15. Now insert the fourth piece and repeat the folding steps.
  16. Continue the adding and folding process. I used 24 pieces to make a medium size a friendship band.
  17. Now we will close the ends to make a circle. You remember the first end we stick with cello tape? Insert this ends in the last piece gap.
  18. Make a diagonal fold for it.
  19. Make another fold as shown in the image 19.
  20. Insert the folded piece in the gap near the red arrow. Repeat the folds for insider part also.
Here is our friendship band ready!