How to make simple and eye catching Rakhi at home?
Raksha Bandhan (Rakhi) is the festival of brother and sister. This is one of the important festivals in India. Sister put the small band of love and care on her brother’s hand and in return her brother committed to his sister to protect her from all problems and keep promising to remain with her in her good and bad situations throughout the life. This festival is being celebrated normally in the month of August. You will find a lot of stalls are selling very attractive Rakhis .The sisters who can’t go to his brother’s home, in such cases they send the Rakhi through post /courier service. Almost every school, you will find the Rakhi making competition and students do take active participation in it.
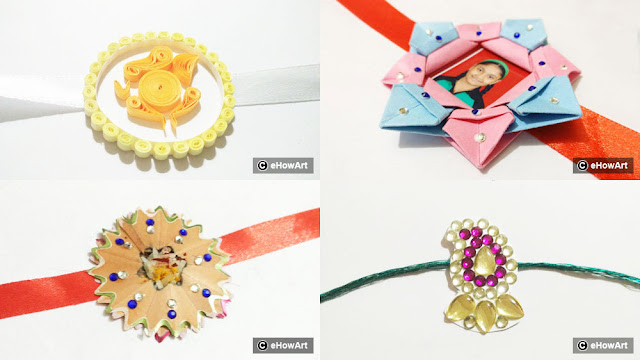
It’s very common to get Rakhi in a market, but what if a sister makes the unique Rakhi for her loving brother? Will it not be creative? In my today's post, I will be sharing quick learning steps on how to make the Rakhi at home. I am sure after reading this post, you will able to make it yourselves .Even this post will be useful to crack the Rakhi making competition in school for your kids.
- How to make a quilling Rakhi?
- How to make a paper origami Rakhi?
- How to make a best out of waste Rakhi?
- How to make a Kundan Rakhi?
So, let's start first with quilling Rakhi.
- As we know Ganesha is the symbol of purity. for making a Ganesha quilling Rakhi, first cut the circle with 2 inches diameter on a white paper. Use a thick paper as a base for a rakhi. with an orange strip, make a circle and paste it in the center of the white circle paper.
- Then make the other parts of Ganesha as shown in image 3 and paste them
- with white strip, make a circle on base paper around the Ganesha. Don't forget to keep space for outer layers of small circles.
- with the yellow quilling strips make small circles and paste them. Add a satin ribbon to tie rakhi and decorate more as per your choice.
Now this is personalized photograph rakhi.
- This tutorial is quite lengthy but worth for making a unique Rakhi. For this Rakhi we need 2, 4 inches size colored square paper. Keep 1 piece as is and cut the other piece into same equal pieces.
- Take a piece of paper and make 4 (vertical, horizontal and 2 diagonals steps)
- Make 2 horizontal folds at center as shown in image 3
- As shown in image 4 make 2 another folds at center.
- Open the fold and make the diagonal folds sharp.
- Make a roof shape fold by pressing the paper.
- Repeat the same roof shape fold down also.
- Please check carefully image 8, open the roof fold at one side and change it into a square fold.
10. Fold the square diagonally in the center.
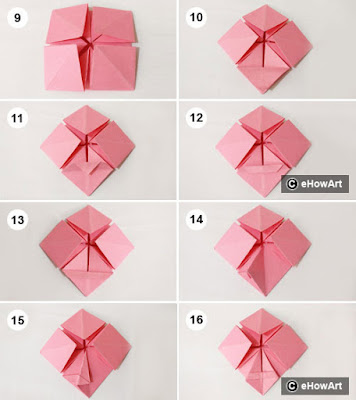
11. Open the fold and fold the corner of a square in half as shown image 11.
12. make fold as shown in image 12.
13. make the third fold as shown in image 13.
14. make a vertical center fold for a square.
15. Make a diagonal fold as shown in image 15.
16. After repeating the folds on both sides we will get a petal.
17. Make another 3 petals in the same way.
18. Now take a small piece of paper and make 4 vertical, horizontal and 2 diagonal folds on it.
19. Make a square fold with it as shown in image 19.
20. Fold the corner of the square in half and unfold it.
21. Fold the corner in 1/4 as shown in image 21.
22. make second fold as shown in image 22.
23. Now make the third fold as per image 23.
24. Fold the square shape vertically.
25. Make a diagonal fold as shown in image 25.
26. Unfold the vertical fold.
27. Repeat the diagonal fold on the other side of the square. we will get a part of Rakhi.
28. Complete the other 3 parts also. Now we have 5 parts total.
29. Now it's time to assemble. Put 1 blue in between of pink parts.
30. Make a fold on the corner as shown in image 30.
31. Put folded corner inside the blue part.
32. Repeat the same steps for another 3 sides. Yu will get a flower shape. Stick an Icard size photo of brother or sister inside it. Add a satin ribbon to tie the Rakhi on hand. Decorate the rakhi to look more beautiful.
Now it's a turn for Rakhi which is a good example of best out of waste.
Please check out our previous posts on this blog: http://ehowart.blogspot.in/
DIY best gift on father’s day (handmade photo frame)
Sari painting in Indian style
Best out of waste: key/toothbrush/napkin holder
Lord Vitthal painting on canvas
DIY pouch using pot holder
Fancy tie knot (Trinity)
Origami paper shoes
How to make artificial flowers with stocking cloth?
Fancy bow hair pin
Fancy tie knot (Fishbone)
Cross bag using pot holder
15. Make a diagonal fold as shown in image 15.
16. After repeating the folds on both sides we will get a petal.
17. Make another 3 petals in the same way.
18. Now take a small piece of paper and make 4 vertical, horizontal and 2 diagonal folds on it.
19. Make a square fold with it as shown in image 19.
20. Fold the corner of the square in half and unfold it.
21. Fold the corner in 1/4 as shown in image 21.
22. make second fold as shown in image 22.
23. Now make the third fold as per image 23.
24. Fold the square shape vertically.
25. Make a diagonal fold as shown in image 25.
26. Unfold the vertical fold.
27. Repeat the diagonal fold on the other side of the square. we will get a part of Rakhi.
28. Complete the other 3 parts also. Now we have 5 parts total.
29. Now it's time to assemble. Put 1 blue in between of pink parts.
30. Make a fold on the corner as shown in image 30.
31. Put folded corner inside the blue part.
32. Repeat the same steps for another 3 sides. Yu will get a flower shape. Stick an Icard size photo of brother or sister inside it. Add a satin ribbon to tie the Rakhi on hand. Decorate the rakhi to look more beautiful.
Now it's a turn for Rakhi which is a good example of best out of waste.
- We can make this Rakhi with waste materials. It's good for a Rakhi competition in school. Just peel the pencils with a sharpener. Peel out whole circles while sharpening. We need 2 circular peeled pencil parts.
- take a small piece of paper and paste the first circle on it, then paste another circle on it.
- Add some gum in the center of Rakhi and put some rice grain on it.
- Then add Haldi Kumkum on rice grain. stick the satin ribbon at the back of the Rakhi. Decorate it with Kundans or you can put some colors as per your choice.
Now its a last very simple rakhi with Kundan.
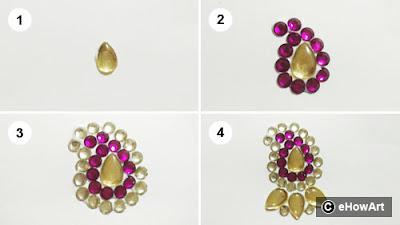
- Take a small piece of white paper and paste a drop shape Kundan on it.
- Make a mango shape outline with round shaped Kundan around the drop shaped Kundan.
- Make an another mango shaped outline with small circular golden Kundan around earlier mango shape.
- Put 3 drops shaped Kundans and 2 small round shaped Kundan below the mango shape. Wait till all the Kundans fix on paper. cut out the extra paper with a scissor. Add thread in rakhi to tie your lovely brother's hand.
Wish you a very Happy Rakshabandhan!!!
Please check out our previous posts on this blog: http://ehowart.blogspot.in/
DIY best gift on father’s day (handmade photo frame)
Sari painting in Indian style
Best out of waste: key/toothbrush/napkin holder
Lord Vitthal painting on canvas
DIY pouch using pot holder
Fancy tie knot (Trinity)
Origami paper shoes
How to make artificial flowers with stocking cloth?
Fancy bow hair pin
Fancy tie knot (Fishbone)
Cross bag using pot holder


No comments:
Post a Comment