Happy Independence Day with bands and Rangoli in tricolors
INDIA. I can’t explain how I feel when I hear the word India. We used to start preparing ourselves for this day at least a month before. Everyone wanted to be perfect in parade and want to make sure no mistakes can happen, so we had practice every day. Lezim is another activity in school on the Independence Day. We can’t forget the drill (kavayat) where all the students in the uniform and tried to give best during the drill (Kavayat).
I feel very lucky that I got my birth after Independence. 15th August is the Independence Day. The time has now changed now and we all are getting busy in day to day life but when I looked back my school days, we used to celebrate this day in memorable ways like drawing competition , speech competition, painting competition. Today I thought I should write this post dedicated to the Independence Day with using the tricolors. My post has four sections.
1. Tri color band –close weaving
2. Tri color band – open weaving
3. Tri color Rangoli using dots
4. Tri color Rangoli free hand
Let’s learn how to make Tri color band with close weaving
It’s very easy to make in simple four stepsWe need to take eight woolen threads in equal length and make 4 groups. Each group will consist of 2 and follow the colors as white, green, white and orange. Make a knot combining all of them .Fix it in writing pad’s clip so that it will be easy to handle while making a band.
Orange color is the first color in Tiranga (Indian Flag), it’s a symbol of bravery. Take a group having orange color and make knot around the white wool as shown in image 2.
White color is the second color in Tiranga and it’s a symbol of piece .Take white color wool and make a knot as shown in image 3.
Last is Green .It’s a symbol of revolution. By taking this color wool , we will be now completing the tri color band as shown in figure 4.
Making a tri color band in open loop is not at all difficult
For this band we need 3 woolen threads, one each of Orange, White & Green. Arrange them as shown in image 1, which will look like the heart shape. As shown in image 2, pass right sided end below the other end of wool. Pass the right sided end as indicated in image 3 following the arrows. Pull the both end of wool gently until you get the shape as shown in image 4.this is very important step which will give the right visual look to this band.The process which we followed so far through image 1 to 4, which will further continued. As shown in image 5, create a loop with right sided end. Now moving
ahead, the left sided end needs to pass below the other end as shown in image 6. Left sided end needs to pass just following the arrows as shown in image 7. Pull both ends gently and adjust the length as you need to fix it over the hand, as shown in image 8.
Cut the extra length of wool once you knot them together.
Tri color Rangoli using dots
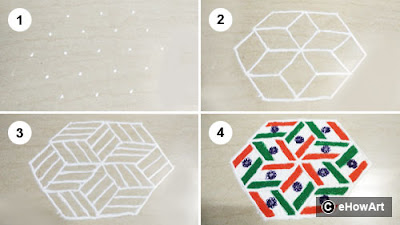
Rangoli is the nice way to decorate the entrance of house and shows warm welcome to our guests. This is very simple and easy Tri-color Rangoli design especially for Independence Day.For first row, put only 5 dots with equal interval in a straight line. This will be our middle row of our Rangoli. Now above and below, take in between center of the dots and put 4 dots .Now take in between centers again and put 3 dots at one row above and below. With this, we will get 5 rows, please make sure the dots are rightly placed before we proceed further .The outline of dots should be a hexagon shape.
As shown in image 2, join the dots with lines, you will get 12 diamond shapes. Now please look at the image 3, we need to divide each diamond shape in 3 equal parts as like our Tiranga. The angle and direction of division lines must follow the pattern as shown in image. Fill the Rangoli using tri color (Orange, white and green) as shown in image 4.Also make Ashok Chakra in the center of white bands. If you want, you may include few more details around the hexagon.
Tri color Free hand Rangoli
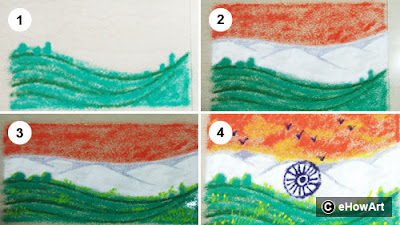
In this Rangoli you can see our Tiranga and scenery too. This Rangoli is a symbol of geographically rich India which has green forest at bottom, white snow at middle andSnow Mountains with orange color sky at the top.
Let’s start with Green forest of our India. Use two green colors to show trees and grass differently. White color to be use at middle as shown in image and draw the mountain lines with light blue colors ,finally add orange for the sky , adding few yellow shades will give reach look to this Rangoli. Draw Ashok Chakra at the center of white band. As a final touch add some birds in the sky and some shades of light green colors to indicate the grass.
Your Rangoli is now ready.
I am dedicating this post to our country –India .This is our national festival and we celebrate it with proud and happiness. We are so lucky to be a part of our nation.
Bharat Mata Ki Jay!!!
Please check out our previous posts on this blog: http://ehowart.blogspot.in/
DIY best gift on father’s day (handmade photo frame)
Sari painting in Indian style
Best out of waste: key/toothbrush/napkin holder
Lord Vitthal painting on canvas
DIY pouch using pot holder
Fancy tie knot (Trinity)
Origami paper shoes
How to make artificial flowers with stocking cloth?
Fancy bow hair pin
Fancy tie knot (Fishbone)
Cross bag using pot holder
Best of waste: DIY bracelet using dead USB cable


No comments:
Post a Comment